in Houston Texas, and our web site, installer.com
| 1996 Jeep Grand Cherokee | |
| Start by removing the 5 screws across the top of the dash panel - there are three of them marked with an X in this photo. |  |
| The screws are normal Phillips head screws |  |
| There are some ore screws under the trim pieces - These trim panels are only held on with snaps so you should be able to pull them off with your fingers.. Sometimes you may want to carefully pry with a screwdriver if you cant get your fingertips in behind the trim piece to get it started. |  |
| Should pop right off - There are THREE Phillips head screws behind this panel to be removed. |  |
| Another trim piece on the left of the steering column removes just as the first one did |  |
| There are two phillips screws behind this panel |  |
| Once you
remove the 5 screws across the top, the two trim panels below, and the 5
screws holding in the bottom of this panel, then it can be removed...
Stick your fingers in the TOP and pull it out carefully. The whole
thing should come out fairly easily. Notice the 2 Xs, these are the radio bolts, better visible in the next image. |
 |
| Two number 10 bolts hold the factory radio in place |  |
| Removing the two number 10 bolts with a ratchet and socket. |  |
| Once the two bolts are out the factory radio should slide right out |  |
| On this radio there are a total of 4 plugs, the two on the far left are a black one and a gray one. The second X marks the ground terminal which is a push on terminal pushed on to the back of the radio. and the third X is the antenna connection. | 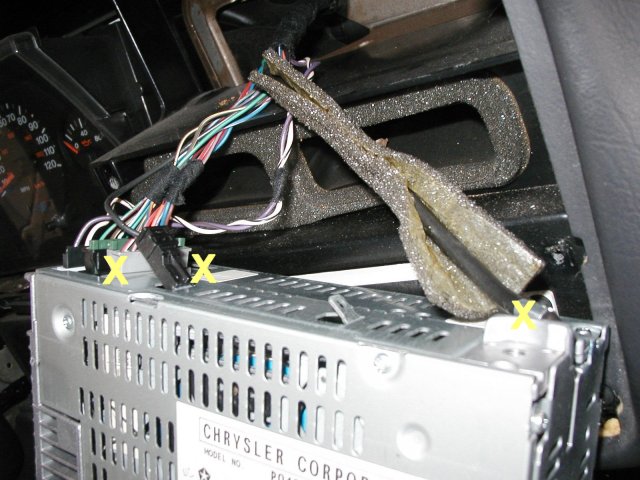 |
| Here they are again - 1 is the ground connector. 2 and 3 are the power and speaker wire plugs and number 4 is the antenna connection |  |
| Since the old radio was a little bigger than normal we are using a 99-6501 dash kit and a 70-1817 wire harness so we don't have to cut the factory wires. |  |
| This dash kit works on several different cars so we remove the tabs that we wont need by cutting them off with our crimper tool. You can break them off with pliers or a utility knife... |  |
| number 1 is the 70-1817 adapter which will plug into the vehicles wires and number 2 is the new aftermarket radio harness, we want to connect these two together. Usually the colors match and the wires are also labeled. |  |
| Crimping them together with butt crimps and a professional quality crimper. You could solder these wires instead of crimping them if you wish. |  |
| Our harness is all connected and ready to plug into the car |  |
| Plugged in the car and ready to plug the aftermarket radio into the other side. |  |
| Here we use a crimp connector to plug in for the ground wire. |  |
| Mounting the radio sleeve (or cage) into the 99-6501 dash kit. Bending the sleeves tabs back with a screwdriver should hold it in place |  |
| Once the sleeve is mounted securely, the radio should slide right in and CLICK into possition |  |
| Perfect fit, now its ready to plug into the car. |  |
| 1, 2, 3 easy as pie. |  |
| Now tuck the bundle of wires back out of the way with your fingers as you slide the new headunit into place. |  |
| Put the factory bolts back in |  |
| Dash panel back in place and ready for the customer to enjoy it. |  |